
TL;DR

Turn quiet afternoons into listening time
- Thousands of audiobooks, podcasts and originals
- Listen on your phone, tablet or Echo — also offline
- Cancel anytime
For a raised bed about 10–12 inches deep, use a quality raised-bed mix or blend screened topsoil with finished compost. In a deeper bed, you can save money by adding clean, untreated branches or other plant material at the bottom, then keeping a generous soil-rich layer above it; water the fill, let it settle, and top it up before planting.
A raised bed can look full on delivery day and still sink several inches after its first deep watering. That’s normal: soil settles, and buried leaves or wood slowly break down. A little planning helps you avoid paying for more mix than you need or discovering that your carrots have run out of room.
This guide walks you through choosing a fill, calculating the amount, and filling the bed in manageable steps. You’ll see when a simple soil-and-compost blend works, when clean organic material can reduce the cost, and what to watch for if the bed sits near an older building or road.
Think of filling a bed like making a sturdy sandwich: the bottom can include a substantial layer of clean material in a deep bed, but the part where roots grow needs a dependable, soil-rich filling. Your bed’s depth, the plants you want, and how easy it is to move materials should guide each choice.
For a bed about 10–12 inches deep, use raised-bed mix or screened topsoil blended with finished compost.
Calculate volume with length × width × fill depth, keeping your measurements in the same units.
Use clean, untreated branches or leaves only in a deep bed, and leave enough soil-rich material above them for roots.
Water the filled bed to settle it, leave several inches below the rim, and top up where the mix sinks.
Check drainage and the site’s soil history; a plastic liner doesn’t resolve possible contamination.
A practical guide · Soil, steps & smart savings
Filling a Raised Garden Bed the Easy Way
Match the fill to your bed’s depth and your crops. Build a dependable, soil-rich root zone, estimate the volume before you buy, and expect the surface to settle after watering.
Key insight
Think of the bed as a sturdy sandwich: clean material can go low, but roots need a generous layer of growing mix above.
Organic fill decomposes over time. Leave room below the rim and plan to top up as the bed settles.Raised-bed mix or soil + compost
Approximate soil depth for many
4 × 3 ft bed at 10″ fill depth
Set, clear, layer, fill, water, plant
01 / Choose the mix
Let depth and crop needs guide the fill
For a bed about 10–12 inches deep, keep the fill consistent with quality raised-bed mix or screened topsoil blended with finished compost. A deeper bed gives you more flexibility below the root zone.
Use a balanced growing mix
Choose quality raised-bed mix or combine screened topsoil with finished compost. A consistent blend is easier to manage than a compost-heavy fill.
Layer clean plant material below
In a deeper bed, loose untreated branches or leaves can occupy some lower space. Keep a substantial soil-rich layer above for roots.
Finish below the rim
Leave a few inches for watering and mulch. The space also helps keep soil from spilling onto paths.
02 / Estimate before buying
Measure once; order with confidence
Multiply the inside length, width, and planned fill depth. Keep all measurements in the same units, then convert the result to cubic feet or cubic yards for ordering.
Length × width × fill depth
Use inside bed dimensions where possible. Decide how far below the rim the finished surface will sit. If you add lower branches, calculate the soil depth above them separately.
A 4 × 3 foot bed with 10 inches of fill
Ten inches is about 0.83 feet. This estimate is before leaving headroom or allowing for settling; water the fill and top up where it sinks.
Approximate soil depth by crop group
Depths vary by crop. Check guidance for the plants you intend to grow.
Pick a buying format that fits the job
Bagged mix can be convenient for a small bed; bulk blends often cost less per volume for larger beds. Check product contents and coverage.
03 / Layer thoughtfully
Save on fill while protecting the root zone
A simple lower layer of organic material is sometimes associated with hugelkultur, though it is not the same as building a carefully constructed mound. Use clean material, keep it loose, and expect it to shrink.
Use healthy, untreated plant material
Clean branches, leaves, or similar natural debris can fill some lower space in a deep bed. Lay it loosely so air and water can move through it, then cover with a substantial depth of soil-rich growing mix.
Avoid materials that can cause trouble
Skip treated or painted wood, diseased plants, invasive weeds with viable seeds or roots, potentially contaminated material, and fresh manure.
What happens as the bed settles?
Illustrative sequence: the amount of settling varies with materials, watering, and time.
Keep roots in soil-rich material
Wood can temporarily tie up some nitrogen near the wood-soil boundary. Add compost as you top up.
04 / The six-step fill
Work in manageable stages
Set up the bed before adding weight, build layers in order, then water to reveal low spots. Short work sessions and smaller buckets can make hauling easier.
Set the bed in place
Check the location, sunlight, and drainage before adding weight.
Clear the ground
Remove persistent weeds and loose debris from beneath the bed.
Add lower material
For a deep bed, place clean, untreated branches or leaves loosely at the bottom.
Add growing mix
Use raised-bed mix or a balanced topsoil-and-finished-compost blend.
Water and top up
Water thoroughly, let the fill settle, then add mix where the surface sinks.
Plant and mulch lightly
Keep mulch away from plant stems and leave room below the rim.
05 / Site & water checks
Keep drainage, soil history, and moisture in view
Raised beds can dry faster than in-ground soil, especially in warm or windy weather. Check moisture below the surface and water deeply when needed.
Give water a clear path
Check that water can drain before filling. Cardboard can suppress weeds temporarily, but landscape fabric may impede drainage or root growth. Avoid lining the bed with plastic.
Know what lies beneath
Near an older building, road, or potentially contaminated ground, consider tested clean soil and a barrier between native ground and the bed. A liner does not replace knowing what the soil contains.
Choose a simple mix that suits your bed’s depth
Filling a raised garden bed the easy way starts with matching the fill to the bed’s depth and the plants you plan to grow. For a bed about 10–12 inches deep, use a quality raised-bed mix or combine screened topsoil with finished compost. A deeper bed gives you the option to put clean, untreated plant material below the growing mix.
For example, if you’re planting lettuce, parsley, and other shallow-rooted crops in a modest bed, a consistent blend of topsoil and compost keeps the job straightforward. If your bed is much deeper and you have healthy fallen branches available, those can occupy part of the lower space. Keep the upper layer generous so roots have room in soil-rich material.
Compost helps improve a growing mix, but it isn’t automatically a complete substitute for soil. Compost varies, can shrink as it decomposes, and may hold water differently from mineral soil. A balanced blend is usually easier to manage than a bed filled entirely with compost.
If lifting or hauling is hard on your back, order delivery close to the bed and move materials in smaller batches using a cart or bucket. Bagged mix can be convenient for a small bed; for a large one, a bulk blend may cost less per volume. Either way, check what the mix contains, since products vary by region and brand.
Products Worth Considering

Dyson Cyclone V10 Origin Cordless Vacuum

Ring Wired Doorbell Plus (2nd Gen) and Chime (3rd Gen), Nickel Silver and White

Philips Hue Bridge Pro Smart Lighting Hub
As an affiliate, we earn on qualifying purchases.
Estimate your soil amount before you buy
To estimate how much fill you need, multiply the bed’s length × width × fill depth, using the same units for all three measurements. That gives you the volume; convert it to cubic feet or cubic yards before you order. This quick calculation helps prevent an expensive extra delivery or a half-empty bed.
Say your bed is 4 feet long and 3 feet wide, and you want 10 inches of fill. Convert 10 inches to about 0.83 feet, then multiply 4 × 3 × 0.83. You need roughly 10 cubic feet of material, before accounting for settling or space at the top. If you add branches at the bottom of a deeper bed, calculate the soil depth above them separately.
Use the bed’s inside dimensions when you can, and decide how far below the rim you want the finished surface. Leaving a few inches of space makes watering and mulching easier and helps keep soil from spilling over the sides. A bed filled right to its rim may look generous, but water and loose mulch can wash onto the path.
If measuring feels fiddly, check the bed’s product dimensions or ask a supplier what volume a particular number of bags covers. Keep the calculation and delivery amount handy. For instance, a family filling a 4-by-3-foot bed can start with one bulk order or a planned number of bags, then top up after watering rather than guessing at the garden center.
Use branches and leaves only in a deep bed
In a deeper raised bed, clean, untreated plant material can fill some of the lower space and reduce the amount of purchased soil. Use healthy branches, leaves, or similar natural debris, then add soil and compost above. This simple layering approach is sometimes associated with hugelkultur, though a basic layer in a raised bed isn’t the same as building a carefully constructed mound.
Imagine you have a deep bed and a pile of small, untreated branches from pruning a healthy shrub. You can lay them loosely at the bottom, add leaves around them, and cover the layer with a substantial depth of growing mix. Don’t pack the material tightly; air and water need to move through it, and the contents will settle over time.
Choose materials with care. Avoid treated or painted wood, diseased plants, invasive weeds that may regrow from roots or seeds, and anything that might be contaminated. Fresh manure also doesn’t belong in a new bed ready for planting; it can harm plants and may pose food-safety risks.
As wood breaks down, it can temporarily tie up some nitrogen near the boundary between wood and soil. Keep most active root growth in the soil-rich upper layer, add compost when topping up, and expect the bed’s surface to sink. A few logs may save money today, but they don’t remove the need for suitable growing soil where your crops will root.
Fill the bed in six manageable steps
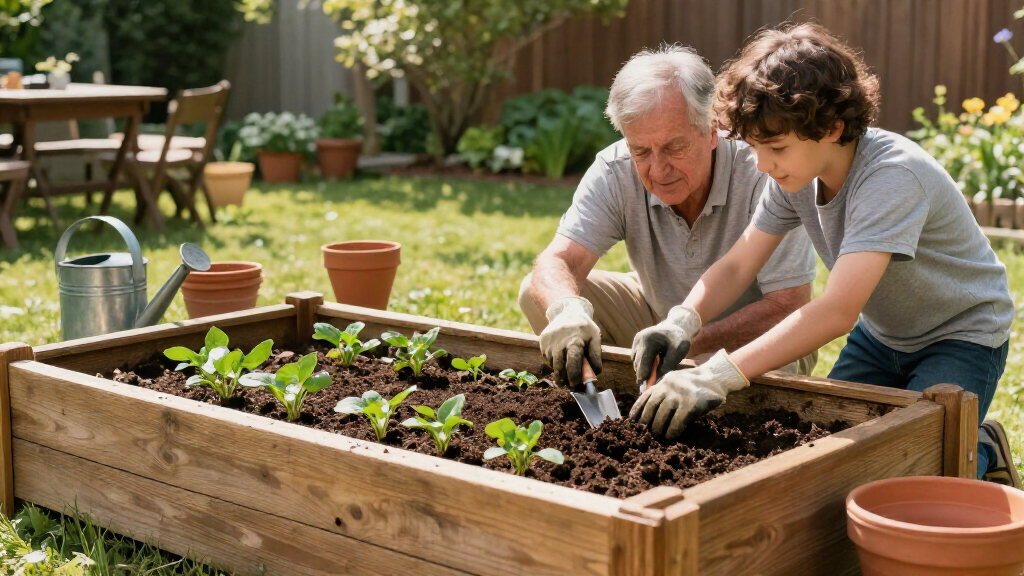
To fill a raised garden bed, place it in its final spot, confirm that water can drain, add clean materials if the bed is deep, and finish with growing mix. Watering the filled bed helps the layers settle so you can spot low areas before planting. Breaking the work into short stages also makes a heavy job easier to manage.
- Set the bed in place. Check its location, sunlight, and drainage before adding weight. A filled bed is difficult to move.
- Clear the ground below it. Remove persistent weeds and loose debris.
- Add lower material if appropriate. In a deep bed, place clean, untreated branches or leaves loosely at the bottom.
- Add the growing mix. Use raised-bed mix or a balanced topsoil-and-finished-compost blend, keeping the root zone soil-rich.
- Water thoroughly. Let the mix settle, then add more where it sinks.
- Plant and mulch lightly. Keep mulch away from plant stems and leave room below the rim.
For example, if your family can only work in short bursts, one person can carry small buckets while another spreads the mix with a hand tool. Pause before fatigue sets in. The fill doesn’t need to happen all at once, and waiting between stages can make it easier to level and water each layer.
Many leafy crops and herbs can grow in roughly 6–8 inches of soil, while root crops and larger fruiting plants generally benefit from more. Needs vary by crop, so check guidance for what you intend to plant. A bed sitting on hard paving may need more depth than one open to suitable ground below.
Keep drainage, weeds, and site safety in view
A raised bed needs water to drain, and its location matters as much as its contents. Set the bed where it will stay, check sunlight, and avoid blocking drainage holes or gaps. In warm or windy weather, raised beds can dry faster than in-ground soil, so check moisture below the surface rather than judging by dry-looking mulch alone.
Cardboard under a bed is optional. It can temporarily smother grass and weeds as it decomposes, but it should not prevent water from draining. Landscape fabric can impede drainage or root growth, and plastic lining is generally a poor fit because it can trap water. If you’re weighing cardboard against no barrier, think about what grows beneath the bed and how freely water can escape.
Where a bed sits near an older building, a road, or potentially contaminated ground, consider finding out what is in the native soil. Clean, tested soil and a barrier between the ground and bed may be appropriate, but a liner alone doesn’t tell you whether the soil is safe. If contamination is a concern, look for local testing guidance or ask a qualified local professional about the site.
Take a small example: a sunny bed beside an old painted structure may look like an easy gardening spot, but the nearby ground deserves a closer look before you grow food there. Set the bed on a stable surface, maintain clear paths for access, and plan a reachable water source. A comfortable setup makes tending herbs or tomatoes more pleasant week after week.
Expect settling and make topping up part of the plan
A new bed often sinks after watering because air pockets close and organic material breaks down. That change is normal settling, not a sign that you filled it incorrectly. Leave several inches below the rim at the start, then add a suitable soil-and-compost blend if the surface drops too far.
For instance, you may fill a deep bed in early spring, water it, and find the surface several inches lower the next morning. Check the level again after the mix drains, then add material as needed. If the bed contains wood, leaves, or other plant matter, it may continue settling across the season and need another top-up next year.
Water deeply enough to moisten the growing layer, then check the soil with a finger or small hand tool. A dry crust on top doesn’t always mean the roots need water, and a damp surface doesn’t guarantee deeper soil is moist. A light mulch layer can help conserve moisture, but keep it away from stems and leave space for air around the plants.
Settling also affects your budget. If you use lower layers to save money, plan on adding some growing mix later. The tradeoff may work well in a deep bed with plenty of clean branches, while a shallow bed is usually simpler to fill consistently from top to bottom.
Frequently Asked Questions
What is the easiest soil mix for a raised bed?
A quality raised-bed mix is the most straightforward choice, especially for a small bed. You can also blend screened topsoil with finished compost; check the ingredients because products vary. For example, a modest herb bed is often simpler to fill with one suitable mix than with several separate layers.
Can I put branches or logs at the bottom?
Yes, if the bed is deep and the wood is clean, healthy, untreated, and unpainted. Cover it with a substantial soil-rich growing layer, since roots need suitable material and the wood will settle as it decomposes. A shallow bed usually has too little depth to make this layer worthwhile.
Should I put cardboard under my raised bed?
Cardboard is optional and can suppress grass and weeds temporarily as it breaks down. Use it only if water can still drain freely, and avoid plastic lining. If weeds are persistent, clear them before filling and check how the bed meets the ground.
How deep should the soil be?
It depends on your crops and what lies beneath the bed. Many herbs and leafy crops grow in roughly 6–8 inches of soil, while carrots, potatoes, tomatoes, and other larger-rooted plants generally benefit from more. Check the needs of the specific crop, particularly if the bed sits on paving.
Can I fill a raised bed with compost alone?
It’s generally better to use compost as part of a balanced growing medium rather than the entire fill. Compost varies, can hold water differently from soil, and may shrink substantially as it breaks down. For example, blending finished compost with screened topsoil gives you a more consistent mix.
Why did my raised bed sink after I filled it?
Water closes air pockets in the mix, and organic layers decompose, so settling is expected. Water the bed, let it settle, then top up low areas with suitable soil and compost. A bed with branches or leaves in the lower layer may need more topping up over time.
Conclusion
Keep the plan simple: match the fill to the bed’s depth, use clean materials, and give your plants a dependable soil-rich root zone. Calculate the volume before buying, water the bed after filling, and expect to add a little mix as it settles.
Then set out your first seedlings and enjoy the sight of fresh green leaves against dark, crumbly soil. A well-filled bed should make growing easier to reach, tend, and enjoy.